Thursday, June 27, 2013

Fairytales: Hansel and Gretel Look

So darlings I'm starting a new series! I'm very excited because I haven't done one since Halloween and this one will be a bit longer. The theme is fairytales, and I've selected a few of my favorites! I don't want to draw on disney too much, but stick to classic motifs in the fairytales. So to start things off I did this sugary sweet look inspired by Hansel and Gretel.


So I started out with my face makeup. I used a medium coverage foundation, maybe half a shade lighter than my skin tone, and buffed it till it blended in completely. Then I patted a full coverage concealer under my eyes with my index finger, then on any blemishes. Then I took a nude highlighter and applied it to my cheekbones for a subtle youthful glow. Then on to blush, this look is very blush-y. I used three colors, first a warm pink dusted lightly in my general cheek area, and up to my temples a bit. Second I took a bright cool pink and focused it just under my cheekbones. Finally I took the slightest bit of a dark fuchsia and blended it in just below the apples of my cheeks, after that I took a clean kabuki brush and blended the three colors together a bit more. 

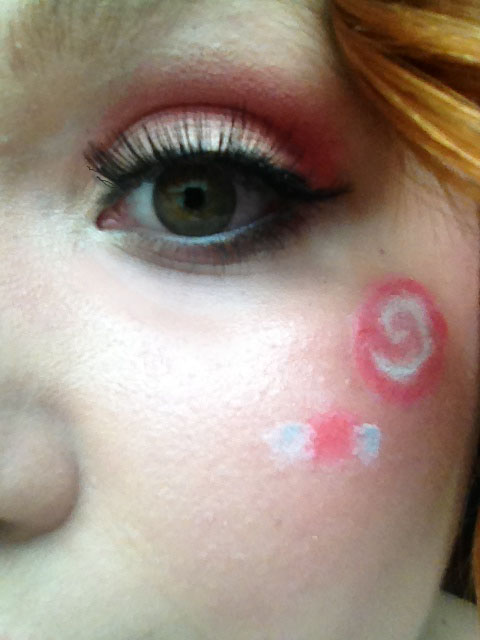
Moving on the the eyes, I started by applying eyeshadow primer all over my eye area (shocking I know!),  then I applied a pink cream eyeshadow to my lids only. Around my lids I applied a even layer of white base with an eyeshadow pencil, completely through the socket and on to the brow bone a bit. It'll look silly but this is the base to pretty things to come! Over top the pink cream base I patted a light peachy pink eyeshadow. Then I pack a bright pink eyeshadow on a flat brush and patted it over the white base, making sure to keep the shape rounded. Around the edges I added a little bit of dark pink, and then down blended with a skin tone color to soften the edges a bit.
Then I applied an even line of black gel eyeliner with an angled brush, no wing at all just along the natural lash line. I gave my lashes a quick coat of black mascara, and the applied some long fluttery false lashes for a doe eye effect.
For the candy I started by making circles of varying sizes with the same white base from before. Then I patted a matte white eyeshadow on top on them. I then took pink eyeshadow on a very small brush and made the swirl and candy pieces.
For lips I used a tinted lip balm in a soft pink and patted a little white in the center for a fuller look.

Products Used:
(In order of use)
Face: MUFE HD Foundation in 115, Tarte Maracuja Concealer in Light, MAC Cream Color Base in Hush, Tarina Tarantino Blush in Parasol, Be a Bombshell Blush in Sweet Cheeks, Milani Baked blush in Red Vino.

Eyes: Urban Decay Eyeshadow Primer, Maybelline Color Tattoo in Inked in Pink, NYX Jumbo Eyeshadow Pencil in Milk, Wet n Wild Light Pink in the Silent Treatment Trio, MAC Free to Be Eyeshadow, Two Cosmetics Trio in Heartache, Urban Decay Foxy, MAC Blacktrack Fluidliner, Maybelline Full n Soft, Jcat False Eyelashes in EL20.

Candy: NYX Jumbo Eyeshadow Pencil in Milk, Sugarpill Tako Eyeshadow, MAC Free to Be Eyeshadow.

Lips: Revlon Lip Butter in Strawberry Shortcake.

Tuesday, June 18, 2013

Review: Revlon Lip Butter in Tutti Frutti

Hey there ladies and gents! Today I have a little review for you before I start my new makeup series. This is one of the original lip butters, so it's been out for awhile; however I recently picked up Tutti Frutti and its such a gorgeous color for summer so I thought I'd show you!

Please pardon my nails!


Although this is probably old news to a lot of you, but lets talk about packaging quick. It's a sleek rectangle with a color coordinated outer plastic shell and twist up metal tube inside. I'm a fan. The one thing I don't really like though is that it doesn't come with a ton of product. The picture above shows it twisted all the way. With only 2.55 grams of product it has quite a lot less than your average lippie. I'm not super upset with it though because a little goes a long way so they last awhile.

Moving on, The color is a semi-sheer orangey coral. It'll look more pink or more orange depending on your skin tone, but on me it's fairly orange. It's very creamy and pigmented just like the others I own (Candy Apple & Strawberry Shortcake) and if you're not eating of drinking it'll last about 3 hours.

So what do you guys think, new summer fave? Let me know in the comments!


Sunday, June 16, 2013

Pale Girl Glow!

Hey sorry its been awhile guys, I've been having some computer trouble! Now it's no secret I'm pretty fair (about NC15/20). And there is absolutely nothing wrong with that! As a society we are bombarded with a tan white girls as a standard- when that's only one kind of beauty. But as the weather gets warmer we like to get a summery glow. So today I wanted to do a post on how to look naturally glowy and warm with a light complexion.


First I want to give a couple pointers before I do a quick look.
1) Always use a foundation that matches your skin. Even in summer. No buts. It's tempting to use a darker shade to make you look tanner but it never looks good. It'll just make your skin look orange and or dirty. Instead match your shade and then use a bronzer, which brings us to my next point. I'm wearing Nars Sheer Glow in Deauville.

2) Get a nice matte bronzer. I have nothing against shimmery ones- I own quite a few. However a matte bronzer is a staple that everyone needs in their makeup collection, no matter how small it is. I suggest getting one in a medium chocolate like color. A mistake many pale girls make is getting a bronzer thats too light and orangey. It looks really unnatural to have something that orange toned all over your face. I've been really liking Too Faced Chocolate Soliel Bronzer, but NYC Smooth Skin Bronzer.

3) Find a coral or peachy blush that you like. It will instantly warm your face in the most natural way possible. In fact if you don't feel comfortable with bronzer, just a warm blush will bring a little summer to your palor. If you're warm toned I recommend trying out an orange blush I love them because they sort of create your perfect peachy color with your skintone. I'm wearing MAC Honey Jasmine, I also recommend Hard Candy's Fox in a Box Spicy and Sweet blush as a drugstore alternative.

4) Get a golden highlighter. It'll instantly brighten up your face, it's like faux sunshine. Liquid, powder, or cream there are a lot of options so its easy to get your favorite. I particularly like the Balm's Mary Lou Luminizer, but Sonia Kashuk Super Sheer Highlighter is my new favorite and what I'm wearing here.

So darlings what do you think? Let me know in the comments, and stay tuned because I've got a really fun series coming up. =)

Saturday, June 8, 2013

Review: Sonia Kashuk Sheer Shimmering Highlighter

Hey there! Today I have a review for you guys, along with a possible dupe! So the other day I was at Target and was sucked into the Sonia Kashuk display. I picked up the Super Sheer Shimmering Highlighter.


L: Straight Up R: Very Blended
You can really control the level of shine

It's a light golden shimmering liquid. As the name implies it can be sheered out easily; however it's fairly pigmented and actually has some coverage! It makes your skin look really healthy and nice, and doesn't have that oily look some of highlighters do.
But the big surprise is that this a pretty good dupe for a popular high end product, Benefit Watts Up.
L: Watts Up! R: SSH

Same: Golden toned, the finish is the same, on the skin they look almost identical.

Different: Watts Up is slightly pinker, Different application, Kashuk is liquid/ Benefit Cream, price.

Overall I think I might prefer the Sonia Kashuk one. It's a bit more gold so it shows up more noticeably on the skin. Another big plus is the price difference Watts Up is $30 USD where the Kashuk one is only $9.79 USD. Now that's a noticeable price difference!

So what do you think? Let me know in the comments!


Wednesday, June 5, 2013

Dreamy Lilac Look

Hey guys! Sorry I've been a little MIA, I was out of town. It also occurs to me that I haven't done a full look in forever! So today I'm doing a look based on one of my favorite spring flowers, lilacs.


So I started with by eyes for this (which I highly recommend with dark colors or purples) and used an eyeshadow primer all over my eyelid. Then I took a pink cream shadow and patted it over my lid as a base. Over the pink I pressed a light lavender color, I find that this makes the purple pop more.

In my outer corner I used bright medium purple to bring the color out from the lid, and also to give it a bit more of a pointed shape. I thought the contrast was a little stark, so I blended a mauve-y rose color along the outer edge.

For liner I didn't want something as bold as black gel. So I used dark gray shadow to line just the outer corners of my lids, and then applied mascara to finish it off.

Afte that I got started on my face. I used a medium coverage foundation, with a concealer that has a bit moe coverage. Then I used a bit of a contour color on my cheeks, and added a hint of pink blush to wam my face up a little.

For lips I started by concealing a little around the mouth, because I tend to get redness there. After that I put on a pinky mauve, and topped it off with a neutral shimmery gloss.

Products Used:
Face: MUFE HD Foundation in 115 Ivory, Maracuja Creaseless Concealer in Light, Hard Candy in Pin Up, Be a Bombshell blush in Sweet Cheeks.

Eyes: Urban Decay Primer Potion, Maybelline Color Tattoo in Inked in Pink, Wet n Wild purple from Silent Treatment Palette, Sugarpill Poison Plum Eyeshadow, Two Cosmetics Eyeshadow Duo in Heartache (rose/mauve side), Urban Decay Foxy, Urban Decay Asphalt Eyeshadow, Maybelline The Rocket Waterproof Black Mascara.

Lips: L'oreal Colour Riche Balm in Tender mauve, MAC Lipglass in Underdressed.

I hope you guys like this look! Leave a comment below or tweet me @spicedropblog !