Showing posts with label fairytale. Show all posts

Tuesday, August 27, 2013

Fairytale Series: Evil Queen

Hey there, Miss. Slacker here! This may or may not be the last look in my fairytale series, but if is the last one at least I love the look! I tried to keep these from being too Disney inspired but a little might've slipped in this one, lol. Honestly I got more inspiration from Regina's makeup on Once Upon a Time. But that aside from that I wanted this makeup to be a bit contradictory: dark but still colorful, sudden but not stark, and only a little bit sinister. ;D Let's go see!


First I placed an eye shadow primer to my eyelids, face, and put on some lip balm. You want everything primed before you start. Then I applied a white cream base to my eyelids.  Then starting in the center and moving towards the outside I patted a matte red eyeshadow onto the lid. With a bright matte purple I did the same thing on the outer side of my eyelids.  I blended this shades together in the middle little bit but this doesn't have to be pretty this needs to just the right pigmented base for the rest the eyeshadow to go on top of. Over those two colors (leaving the outside of both clean) I patted a deep shimmering magenta with a blue shift. Then moving in from the right onto the white lid space that's left I put a little bit of a cranberry color. Then the fluffy brush and went in with a mauve eyeshadow as a transition color all around the area where my crease color will be. Then with the same matte purple as before I started to slowly deepen the crease, blending out the edges into a cat eye shape. Once the purple was blended I went with a matte black closer to my natural crease and pulled it through the socket. After that I took a skin toned color and a fluffy brush and cleaned up my brow bone. Careful not to blend too much away though, you don't want the mauve to disappear. Then with a black pencil liner I lined the entirety of my water line. I took a bit of the pencil liner on the outer corner of my lower lash line line and blended it out a little. Then with a little more of the purple I blended it up into the eyeshadow a little more. Then I took a black gel eyeliner I made a tapered line from thick to barely there across my lids. I didn't want to leave my inner corner highlight just plain white, so I patted a opalescent shimmer over it, which give a really 'glowy' effect. Then I did my brows and applied black mascara.

For my face I started out with a luxurious amount of full coverage foundation. Because evil queens don't mess around when it comes to coverage.  After that I concealed under my eyes and lightly dusted there and my t zone to  make sure everything set.  With a taupe contouring powder I went under my cheekbones, a more lightly on my temples, jaw and nose. Then with a deep fuchsia blush on a fan brush I lightly applied it on my cheek bones. The had shimmer in it, so I skipped highlighter. I didn't want this look to be very shimmery. 


For my lips I applied a blue toned red lip liner under a berry-purple lip stain balm.

Products Used:
(In Order of Application)
Eyes: Urban Decay Primer Potion, NYX Jumbo Eyeshadow Pencil, Sugarpill Love +, Sugarpill Poison Plum, Fyrinnae Conjuror, Sleek Cosmetics Sunset Palette 'Cranberry Color', Two Cosmetics Heartache Duo (Pinky Mauve Side), Urban Decay Blackout Eyeshadow, Urban Decay Kinky Eyeshadow, Urban Decay Perversion 24/7 Pencil Liner, MAC Black Track Fluidline, MAC Redhead Brow Cream, Fluidline, Benefit They're Real! Mascara.

Face: Smashbox Photo Finish Primer, Kat Von D Lock it Tattoo Foundation in Light 48, Tarte Maracuja Creaseless Concealer, Baremineral Original Mineral Veil, NYX Blush in Taupe, Milani Baked Blush in Red Vino.

Lips: Burt's Bees Original Lip Balm, MAC Cherry Lip Liner, Revlon Just Bitten Kissable Lip Stain in Crush. 


So what do you guys think? Let me know in the comments, I love hearing from you guys!

Saturday, August 3, 2013

Fairytale Series: The Little Mermaid

Hey there! Don't think I forgot about my fairytale series! Today I have my next look which is based on the little mermaid. Again I didn't want this series to be Disney inspired, especially because Sephora just released their little mermaid collection. The last couple looks have been a little more wearable so this one I wanted to go a bit more over the top and crazy with this one.


After applying primer I put the white base in the shape that I want the eye make up, which is a bit of a cat eye. Then with a flat brush I patted a light blue eyeshadow on the majority of my eyelid. After that I put a teal color on the outside of my eyelid. Then with a dark blue I filled in the rest of the cat eye and along my socket. In my inner corners I used a seafoam green color to brighten it up. Then with black gel eyeliner I made a wing to match the eyeshadow. I also added so white to my inner rims, and applied mascara to my upper and lower lashes. Then I did my brows normally.

After that I started to work on my face makeup. I mixed a full coverage foundation with a tinted moisturizer to create a natural looking finish with quite a bit of coverage. Then I used a concealer to hide dark circles and any blemishes. Then using a taupe contour powder I contoured my face a bit, under the cheekbones, temples, jaw, nose the whole shabang- but pretty lightly. Then I put on a shimmering liquid highlighter, to add a sort of watery quality. Then I put on a bit of a neutral blush, just so my face wouldn't be too stark.

My forehead stuff is totally optional, I just wanted to do something fun and artsy. On a big fluffy blush I took the same light blue eyeshadow I used before, and lightly dusted it along my forehead and temples. I made a bit of a gradient, darker at the top light as you go down. Then with a pencil brush I started drawing little wavey lines that sort of mimic water. In some places I blended some white in, to add dimension. Then I drew on the little bubbles closer to my eyes and temples, and then added dots of white sling my forehead.

For my lips I mixed together some liquid lipsticks to create a bright pastel lavender. For some shine I added a lavender lip gloss in the center of my lips.

Products Used:
Eyes: Urban Decay Primer Potion, NYX Jumbo Eyeshadow Pencil in Milk, Lime Crime Parasol Eyeshadow (Chinadoll Palette), Sleek Teal Eyeshadow (Orignal Palette), Sleek Dark Blue Eyeshadow (Orignal Palette), Wet n Wild I Dream of Greenie (Brow Bone Shade), MAC Blacktrack Fluidline, NYX Jumbo Eyeshadow in Milk, Maybelline The Rocket Waterproof Mascara, MAC Redhead Brow Cream, NYX Red Brow Powder.

Face: Coola Tinted Moisturizer, Kat Von D Tattoo Lock It Foundation in 48, Tarte Maracuja Creaseless Concealer in Light, NYX Blush in Taupe, Hard Candy Blush in Pin Up, Sonia Kashuk Liquid Highlighter. 

Forehead: Lime Crime Parasol Eyeshadow, Sleek Teal Eyeshadow, Sugarpill Tako Eyeshadow.

Lips: Sleek Pout Paint in Cloud Nine, OCC NSFW Lip Tar, Sleek Point Paint in Peek-a-Bloo, Darling Girl Apocalips Lipgloss in Jasmine Bone For Hands.

Sunday, July 14, 2013

Fairytale Series: The Big Bad Wolf

Who's afraid of the bug bad wolf? Today I have the next look in my fairytale makeup series! I didn't just want to do hero's, and frankly Little Red's makeup is sort normal: Pale, flushed cheeks, doe eyes. Sort of a less elaborate version of my Hansel and Gretel look. I actually really like how the eyes turned out this look, it made them super big and dramatic looking with out being too dark or harsh. But that aside, lets get started on the tutorial!


 So I started out with my face makeup. To make a even base to start off on a used a little bit of a full coverage foundation and buffed it all over my face. Then to make my skin a little darker (my body is darker then my body right now) I dusted a light brozer over the edges of my face. Then with a darker bronzer I contoured my cheeks, temples, and along the sides of my nose.

I first primed my eye area. Then with brow cream and a small angled brush I filled and shaped my brows normally. After that I started to to draw small strokes up and outward, I slowly brought them further up until they were where I wanted them. After that I added a second layer with a darker color, and then made small hair like strokes to make it more realistic looking.

Moving on the eyes I started by patting a light brown over my eyelids. Then with the same brown I started making a a elongated V deepening my crease. Then I blended a medium dark brown into the V and crease. With a dark red brown I smudged along my upper and lower lash lines for a smokey effect.  Then with a small brush I added an inner corner highlight to brighten up a bit. To blend out the colors a bit more naturally I used a medium nude pink on a fluffy brush of the V. And finally to finish it off I added some black gel liner to the outer half of my upper lash line and added a lot of mascara for fullness.

On my lips I used a neutral pinky brown shade to balance things out.

Products Used:
Face: Kat Von D Lock it Tattoo Foundation in Light 48, NYC Smooth Skin Bronzer in Sunny, Too Faced Chocolate Soleil Bronzer.

Eyebrows: Urban Decay Primer Potion, MAC Redhead Brow Cream, Urban Decay Eyeshadow in Buck, Urban Decay Eyeshadow in Backdoor.

Eyes: Urban Decay Primer Potion, Urban Decay Eyeshadow in Buck, Urban Decay Eyeshadow in Backdoor, Wet n Wild Comfort Palette Dark Red Brown, Wet n Wild Comfort Palette Light Shimmery Shade, Wet n Wild Comfort Palette Medium Pink Shade, MAC Blacktrack Fluidgel liner, Benefit They're Real! Mascara.

Lips: MAC Mocha Lipstick

Sunday, July 7, 2013

Fairytale Series: Princess and the Frog

So today I have the second installment in the my fairytale series. Todays look is a little more understated then the last, they'll probably vary in how wearable they are. For this I wanted to focus on a lilly pad motif, and greens and purples. More of the feel of the story than a direct interpretation.


After doing my foundation and concealer (run of the mill, nothing fancy) I put a eyeshadow primer all over my eye area. Then I took a white cream base and patted it on my my eyelid. Then I took a mint green and applied it over the white base. With a medium blue green shade on a pencil brush I ran it through my socket and then went out and made a curved V for the shape of my eyeshadow. Then I blended the green down to fill in my inter crease. From the outer corner I went down angle that matched the top and then pulled in, and blended it into the the outer third under my eye. Then I blended a purple into the center of my lower lash line. Then with black gel eyeliner and an angled brush, I made a small curved wing. Then I gave my upper and lower lashes a good coat of black mascara. Then I filled in my eyebrows normally.

For my blush I blended a plum gel blush into the apple of my cheeks, then powdered over it a little so it wasn't as intense. Then I applied a lavender lipstick to finish off the look. 

Products Used:
(In order of use)
Eyes: Urban Decay Primer Potion, NYX Jumbo Eyeshadow Pencil in Milk, Wet n Wild Color Trio in I Dream of Greenie mint color, Lime Crime eyeshadow in Jade o Lade (Chinadoll), Sugarpill Poison Plum Eyeshadow, MAC Blacktrack Gel Liner, Maybelline The Rocket Mascara, MAC Redhead Brow Gel Cream, NYX Red Brow Powder.

Face: Rimmel Long Lasting Foundation in Ivory, Tarte Maracuja Concealer, ELF Studio HD Blush in Showstopper, Bare Minerals Orignal Mineral Veil.

Lips: NYX Round Lipstick in Castle.

Thanks for reading! What's your favorite fairytale?

Thursday, June 27, 2013

Fairytales: Hansel and Gretel Look

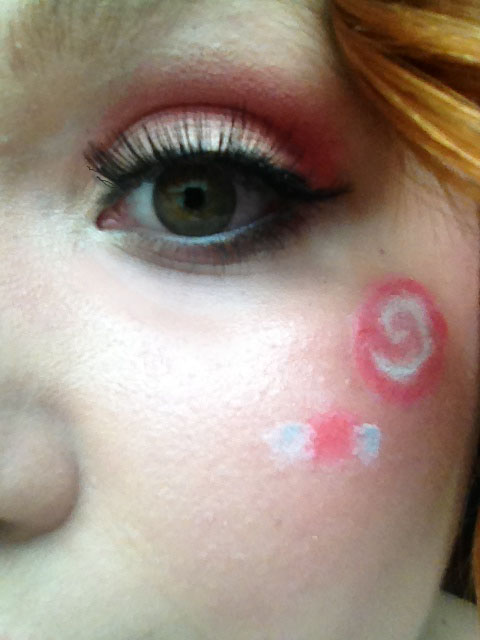
So darlings I'm starting a new series! I'm very excited because I haven't done one since Halloween and this one will be a bit longer. The theme is fairytales, and I've selected a few of my favorites! I don't want to draw on disney too much, but stick to classic motifs in the fairytales. So to start things off I did this sugary sweet look inspired by Hansel and Gretel.


So I started out with my face makeup. I used a medium coverage foundation, maybe half a shade lighter than my skin tone, and buffed it till it blended in completely. Then I patted a full coverage concealer under my eyes with my index finger, then on any blemishes. Then I took a nude highlighter and applied it to my cheekbones for a subtle youthful glow. Then on to blush, this look is very blush-y. I used three colors, first a warm pink dusted lightly in my general cheek area, and up to my temples a bit. Second I took a bright cool pink and focused it just under my cheekbones. Finally I took the slightest bit of a dark fuchsia and blended it in just below the apples of my cheeks, after that I took a clean kabuki brush and blended the three colors together a bit more. 

Moving on the the eyes, I started by applying eyeshadow primer all over my eye area (shocking I know!),  then I applied a pink cream eyeshadow to my lids only. Around my lids I applied a even layer of white base with an eyeshadow pencil, completely through the socket and on to the brow bone a bit. It'll look silly but this is the base to pretty things to come! Over top the pink cream base I patted a light peachy pink eyeshadow. Then I pack a bright pink eyeshadow on a flat brush and patted it over the white base, making sure to keep the shape rounded. Around the edges I added a little bit of dark pink, and then down blended with a skin tone color to soften the edges a bit.
Then I applied an even line of black gel eyeliner with an angled brush, no wing at all just along the natural lash line. I gave my lashes a quick coat of black mascara, and the applied some long fluttery false lashes for a doe eye effect.
For the candy I started by making circles of varying sizes with the same white base from before. Then I patted a matte white eyeshadow on top on them. I then took pink eyeshadow on a very small brush and made the swirl and candy pieces.
For lips I used a tinted lip balm in a soft pink and patted a little white in the center for a fuller look.

Products Used:
(In order of use)
Face: MUFE HD Foundation in 115, Tarte Maracuja Concealer in Light, MAC Cream Color Base in Hush, Tarina Tarantino Blush in Parasol, Be a Bombshell Blush in Sweet Cheeks, Milani Baked blush in Red Vino.

Eyes: Urban Decay Eyeshadow Primer, Maybelline Color Tattoo in Inked in Pink, NYX Jumbo Eyeshadow Pencil in Milk, Wet n Wild Light Pink in the Silent Treatment Trio, MAC Free to Be Eyeshadow, Two Cosmetics Trio in Heartache, Urban Decay Foxy, MAC Blacktrack Fluidliner, Maybelline Full n Soft, Jcat False Eyelashes in EL20.

Candy: NYX Jumbo Eyeshadow Pencil in Milk, Sugarpill Tako Eyeshadow, MAC Free to Be Eyeshadow.

Lips: Revlon Lip Butter in Strawberry Shortcake.