Showing posts with label look. Show all posts

Sunday, February 3, 2013

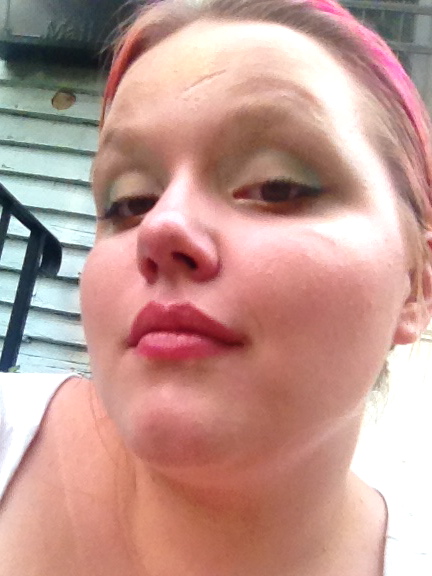
Blue Green Look!

I want to start this post by berating myself for being lazy and not posting enough. I've been crazy busy... but thats still no excuse! So anyway I've been doing brighter looks lately because I hate winter, and this is another one! This look uses some stuff I've recently gotten, but the main pont was to use some products that have been gathering dust in my makeup collection. So I hope you like the look!


So I started out with primer all over my eye (Shocking I know!), and then I took a shimmering lime green and applied it to the inner third of my eye lids. Then I took a turquoise eyeshadow and patted it on the center of my lid. It wasn't blending into a nice enough gradient with the lime for me, so I added a bit of a slightly blue toned medium green and used it to transition the two colors. Then taking a dark emerald shade, I deepened my crease and extended my eyeshade out a little into a point. Then bringing it down I smudged the emerald into the outer third of my eye. I really loved the colors in this look so I kept the liner minimal, just on my upper water line. Then I added black mascara and did my brows.

After my eye makeup I put on foundation and concealed under my eyes. No blush on this one, but I added a little light golden cream highlighter to my cheeks.

For lips I just added a little plum tinted lip balm, to add a little color without competing with my eye makeup.
Products Used:
Eyes: Urban Decay Primer Potion, Nyx Ultra Pearl Pigment in Grass, Sleek Turquoise Color (Orignal Palette), Lime Crime Jade O Lade (Chinadoll Palette), Urban Decay Loaded Eyeshadow, Urban Decay 24/7 Liner in Perversion, Benefit They're Real! Mascara, Mac Brow Creme Fluidline in Redhead, Nyx Brow Cake in Red.

Face: (I totally forgot what foundation I used XD),  Bobbi Brown Concealer in Porcelain Peach, Benefit Watts Up! Highlighter.

Lips: Korres Plum Lip Butter.

Hope you guys liked this look, it was fun to do and gave my Grass Pigment and Sleek Orignal Palette a little love. =)

Saturday, September 8, 2012

Halloween Series: Easy Wonder Woman Look!

As Halloween draws closer I've decided to do a series of looks to go with popular costumes. Today I'm doing one of my favorite superheros, Wonder Woman. She's strong, smart, and to top it off she's a total babe. This look will go well with any wonder woman look. My brows and lips drew their inspiration from the cartoons and comics and the eye makeup is based on the colors of her costume. I just wish I had a black wig for this look!


I started out with an eye primer all over my lid, brows, and under eye. I then took a bright yellow color a pack it on to the center of my lid to my outer corner, avoiding the edge and crease. Then I took a white shadow pencil and I made a base for where I put the red, along the outer half of my crease and my outer corner. Then taking a bright red I packed it on top of the white area. You can fix the edges, but be careful not to blend the yellow and red shadow or it will turn in to a yellow red orange gradient (pretty but not what we're going for). On the outer edge blend the red color into a point, but keep it pretty defined, it shouldn't fade out. Then with a smudge brush I took a dark blue color and took it under the outer third of my eye meeting it up to the reds point (Don't blend!!) then I blended a little lighter blue in the center. 

Then I lined my lower water line with white. (The black you see isn't intended, its transfer but I actually sort of like the way it looks.) Then taking a angled liner brush and a black gel eyeliner I lined my lash line I matched the wing to the blue on the bottom and flicked it up a bit. I applied a light coat of black mascara to my top lashes only and then added little winged half lashes. (The lashes aren't strictly necessary but it really gives the eyes the desired shape.)

Now I wasn't able to get a black wig for this look, and I clearly don't have dark hair but I filled in my brows darker to go with the look. I using a black eyeshadow on a spoolie gently running it through the hairs. I suggest using a matte black that doesn't have the best pigmentation.

After that I applied a primer all over my face and put on foundation. Wonder woman might not get dark circles but I certainly do, so I applied concealer under my eyes being carful not to smudge my eyeshadow. 

I contoured under my cheekbones for a little more definition and added a tiny bit of a peachy pink blush to warm it up. Then I applied highlighter along my cheekbones, don't be afraid to use a little extra highlighter, you're a superhero. I'm in the shade so you can't it very well, but I'm wearing quite a bit.

And of course to finish off this look you need a bright true red. This really isn't optional, it just doesn't work with out the lips. 

I hope you liked this look! I'm putting a poll up for what halloween look I should do next, it'll be up on your right. Please vote and comment if you like this look/ series!

Products Used:
(In order of use.) 
Eyes: Urban Decay Primer Potion, Lime Crime Goldfish Eyeshadow, Nyx Jumbo Eyeshadow Pencil in Milk, Lime Crime Fly Dragon Fly Eyeshadow, Urban Decay Evidence Eyeshadow, Lime Crime Parasol Eyeshadow, Maybelline Eyestudio Gel Eyeliner in Blackest Black, Maybelline Full n Soft Mascara, Ardell 305 Black Lashes.

Face: Hardy Candy Sheer Envy Primer, Rimmel Lasting Finish Foundation in 100 Ivory, Hard Candy Glamouflage Concealer in Light and Medium.

Cheeks: Hard Candy Baked Blush in Pin Up, Hard Candy Boxed Blush in Spicy and Sweet, theBalm Mary-Lou Manizer Luminizer.

Lips: Eos Summer Fruit Lip Balm, OCC Lip Tar in N.S.F.W.


Tuesday, September 4, 2012

Smokey Amethyst Look


Todays look was inspired by one of my favorite semi precious stones, amethyst. Sorry the pictures are a bit grayed out it was super cloudy! But I really like the way the eye turned out so I decided to do a tutorial on it anyway.

So I started out with a primer as always and made sure to cover all of my eye. Then I took a purple/gold/champagne duo chrome shade and applied it all over my lid (its showing up champagne here,  but you could use a light gold, or light purple color, whatever you have!) Then I took a dark purple color and blended it in to my crease being careful not to bring it in to the lid. After that I took a brighter medium purple color and blended that on to the outer edge of where I put the dark purple. Then I just cleaned up around the edge with a nude color along the edges and my brow bone. Then I blended a little of that brighter purple color along my lower lash line, I brought this about 3/4 the way across the bottom. The I took a bit of the dark purple and blended that into the corner of the lower lash line color. I lined my lid with a matte black shadow smudging it out a little, I then applied mascara and some fluttery falsies that taper out. To top in off I lined my lower waterline with a light champagne color.

I really didn't do a whole lot else, I already had some powder on and then I applied a neutral lipgloss and called it good. XD

Products Used:
In order of application
Eyes: Urban Decay Shadow Insurance, Sleek Purple/ Gold Color (Orignal Palette), Urban Decay Rockstar Eyeshadow, Sleek Purple (Orignal Palette), Urban Decay Blackout Eyeshadow, Maybelline Full n Soft Water Proof Mascara, Ardell 117 Black Lashes, Wet n Wild Idol Eyes Creme Shadow in Pixie.

Face: theBalm Sexy Mama Pressed Powder.

Lips: NYX Mega Shine Lip Gloss Sponge Cake.

Sunday, August 5, 2012

Art Inspired Look: Cycles Sirius Poster

Now thats some racy biking!

This look was inspired by this wonderful poster which for me brings out two strong emotions, the first being awe at how lovely it is (its really big IRL too), and second laughter. I find it hilarious that they decided to naked women were the best way to promote bicycle sales, and also that people think that racy ads are a new thing. And you know sex does sell, but I really think if sex should be marketed this is the way to go. She looks very happy on that bicycle. ;D

Anyway this look is a little less directly translated then my previous two. I wanted to convey the soft dream like hues and feeling as well as the glowy gold touched skin. I think I did pretty well, I wish the shimmer on my eyes was a little more pronounced though. This was a fun look to do! It also gave me a reason to test out some BB cream.


After priming my eye I lightly brushed a shimmering light color all over my lid and brow bone to make a shimmery blank canvas. Then in the center of of my eye I blended in a matte nude color. Moving to my inner corner I applied a matte white from my inner corner up to my brows and then blended it out really well. Then on the the outer corner I gently blended in a light blue bringing it into my crease to define that a little more. Then with a fluffy brush I softly patted on a little bright golden shimmer on top of the lid. Unfortunately this didn't show up on camera. =(

I lightly lined my lids with a navy shadow, and winged it out a tiny bit. Then using a light gold cream eyeliner I lined my lower lash line. I applied mascara, and I did do my eyebrows I swear! I have no idea where they went off too well I was taking these pictures.

On to face! I used two different BB creams on face a normal one all over and then a shimmery one on my cheekbones for a natural looking highlight. I dusted a light pink color at the apple of my cheeks and then dusted a golden color over my blush and lightly on my forehead.

I finished off the look with the lightest pink lipstick I can pull off, and a light colored lipgloss. I hope you like it!

Products Used:
(In order of direction.)
Eyes: Too Faced Shadow Insurance, Ulta Silk eyeshadow, Urban Decay Eyeshadow in Foxy, Sugarpill Tako Eyeshadow, Lime Crime Parasol Eyeshadow (Chinadoll), Sugarpill Glodilux, Sleek navy shadow, Wet 'n Wild Idol Eyes in pixie + Nyx Jumbo Eyeshadow Pencil in Pure Gold, and Maybelline Waterproof Full n soft mascara.

Face: Skin 79 Diamond Prestige BB cream, Skin 79 Diamond Luminous Pearl BB cream, MAC fleaur power blush, and E.L.F Studio blush in Giddy Gold.

Lips: Nyx Stella lipstick, Nyx Nude peach mega shine lipgloss.


Monday, July 30, 2012

Movie Inspired: Nala from The Lion King

This is the first look I've put up so far, and I'm very pleased with how it turned out. I used this picture as reference:
I loved how stylized her eye is, and how it doesn't have that typical 'cat eye' shape. Although I do looove cat eyes, don't get me wrong! So after playing around with color and shape this is what I came up with. =)


Starting off with a primer all ove the eye, I applied a gold cream base all over my lid, and up to my brow. Then over that I used a deep bronzey color on the outer and inner corner of my lid leaving the middle free. It the center of my lid I bended a bright gold color into the outer bronze around the edges. 

Then I mixed a bit of bright yellow gold shadow with a shimmering white color together on a fluffy brush and blended this around this on my brow bone till I got the right color and shine. Remember you don't want the brow bone too white, because it won't contrast enough with the lower color.

I lined my lower  waterline with white and then gently pressed some bright blue in to the outermost part of my lower waterline. Then with an angled brush and some white shadow I created the catlike curve on the bottom, keeping the white very defined from the gold. In the inner corner I mapped out where I want to bring the eyeliner down and brought it up gently to connect with the lid.

I then lined my lids with black gel liner, keeping the line very defined but not too thick. (Don't wing it! Resist the urge!) Then on the inner corner I pointed it down in the middle of where I put the white. Make sure the points are even, and I recommend to go back around the point with white, to keep it sharp. Apply mascara, and lashes if you're so inclined.

I filled in my brows, trying to make them 'lion-ish' lol. Then applied bronzer and a golden peachy pink blush. My lips I made a neutral brownish color, which is reading way more red on camera, and topped with a clear sparkly gloss.

There you have it! 

Products Used:
(In order of direction)
Eyes: Too Faced Shadow Insurance, Nyx jumbo eye pencil in Pure Gold, Bronze color from Sleek original palette, Gold color from Sleek sunset palette, Bright yellow color from Sleek sunset palette, Ulta Slik eyeshadow, Mac Fascinating Eyeliner, Lime Crime Parasol, Sugarpill Tako, Maybelline Eyestudio Lasting Drama gel eyeliner in Blackest Black, and Maybelline Full 'N Soft Waterproof Mascara in Very Black.

Face: Rimmel Lasting Finish Foundation in Ivory, Hard Candy Glamoflauge in light+ medium mixed together, TheBalm sexy mama pressed powder, Hard Candy Glamazon Bronze Cream Bronzer, and Sleek blush in Rose Gold.

Lips: Avon Color Rich Lipstick in Burnished Gold, Burts Bee's lip shimmer in Cocoa, and Hard Candy Plexi Gloss in Genie (There has to be an easier way of getting a natural brown, I just don't own one.)